Install Your Lightroom Presets
Are you struggling to install your new Lightroom presets? Whether you just need a refresher or step-by-step instructions we got you covered! Here’s some FAQs along with a comprehensive guide to installing your new Lightroom presets on both desktop and mobile.
The information is broken down and simplified. So whether you’re new to Lightroom or just new to using third-party presets, you should be able to install your amazing, shiny, new presets with ease.
What’s the difference between these preset file types?
- Lrtemplate or XMP: Lightroom presets for desktop come in either lrtemplate or xmp files. As Adobe moves away from lrtemplate in favor of xmp, we’ve chosen to have all our Lightroom presets available as xmp files.
- DNG: or Digital Negative. This is basically a raw image file that contains all your preset settings.
What do I do with this ZIP file?
Well, unzip it. Lightroom presets (and many other digital downloads) usually come in a ZIP file in order to compress the files to save on space and allow for faster downloads.
If your Lightroom presets came in a ZIP file, go ahead and unzip it by double-clicking. This will create a folder of the same name with your extracted presets inside. Now you’re ready to install your presets.
There’s more info on ZIP files and iOS below.
How do I install Lightroom presets?
There’s a few different ways to install your new presets. And with Lightroom CC, the process is super simple.
For Lightroom CC and Lightroom Classic CC (Desktop)
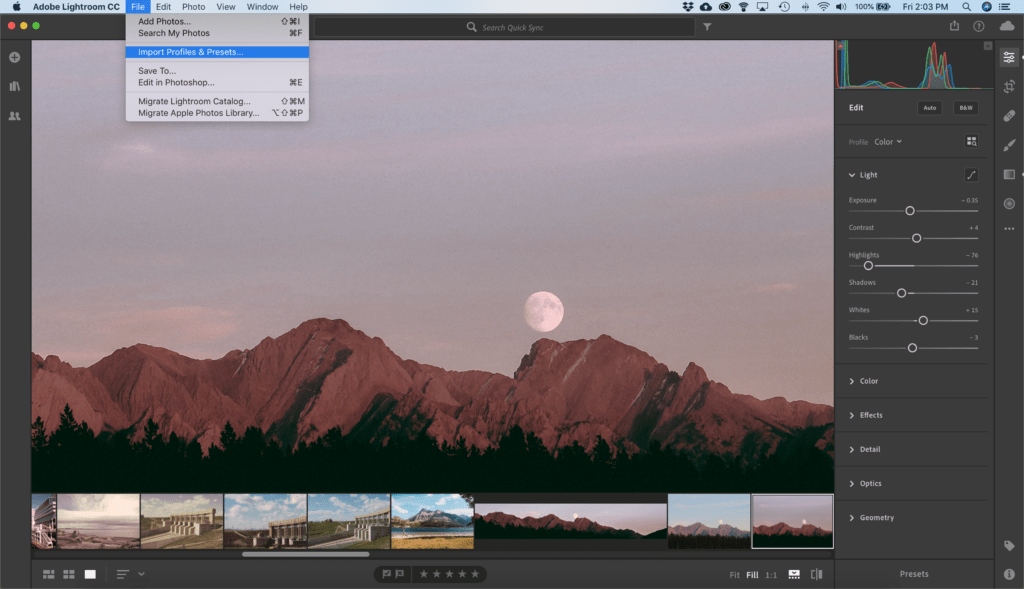
- Launch Lightroom.
- From the menu bar, click File > Import Profiles and Presets.
- In the import dialog, navigate to wherever you saved your presets and select the presets you want to install.
- Click Import.
- Restart Lightroom.
Alternative Methods for Desktop
For Lightroom CC
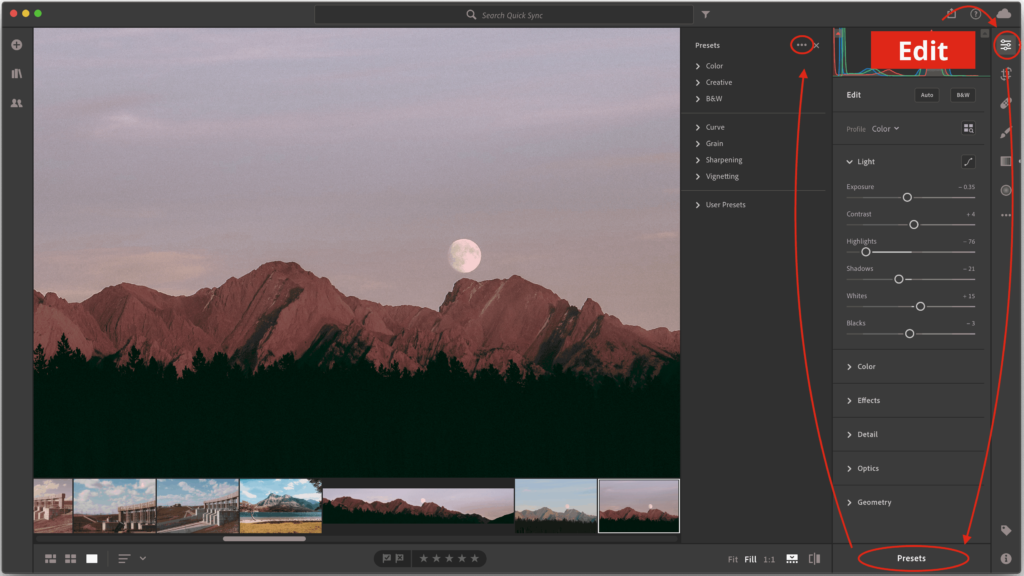
- Launch Lightroom.
- From the righthand side, click “Edit”
- At the bottom of the Edit panel, click “Presets”.
- Click the three dots icon at the top of the Preset panel.
- Select “Import Presets…” which will open the import dialog.
- Find and select the presets you want to install. Then click “Install”.
- Restart Lightroom
For Lightroom Classic CC
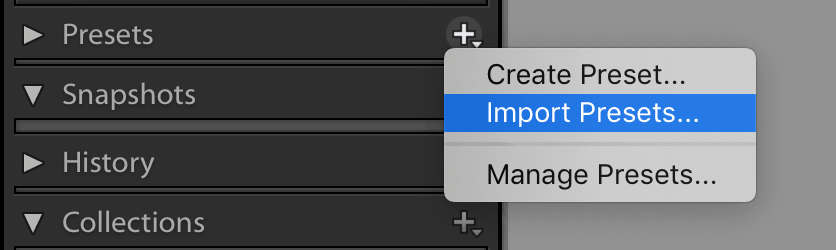
- Launch Lightroom.
- Click on the “Develop” module.
- On the left hand side, find the “Presets” dialogue and click on the plus “+” icon.
- Select ”Import Preset(s)”. This will open the import dialog.
- Find and select the presets you want to install. Then click “Install”.
- Restart Lightroom.
For Lightroom CC Mobile
If you have both Lightroom CC Desktop app and the Lightroom CC Mobile app, then the presets and profiles you’ve installed in your desktop app should automatically sync with Lightroom on mobile.
However you can still use and install your presets even if you are exclusively using the free Lightroom CC Mobile app without the desktop version.
Installing Mobile Presets (DNG)
If you want to download the ZIP file directly onto your iPhone or iPad, skip to the next section. However, if you have your mobile presets already unzipped and saved on your phone as individual DNG files, follow the steps below:
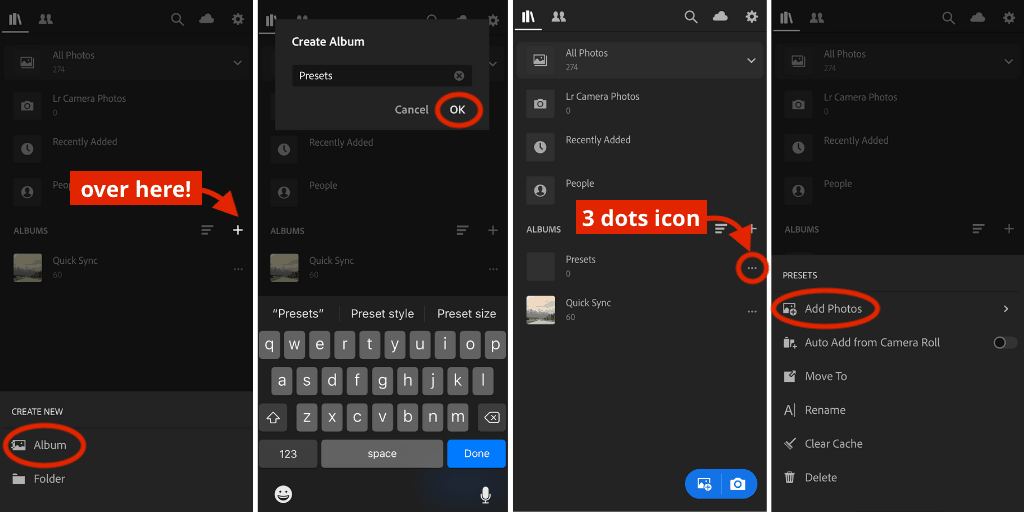
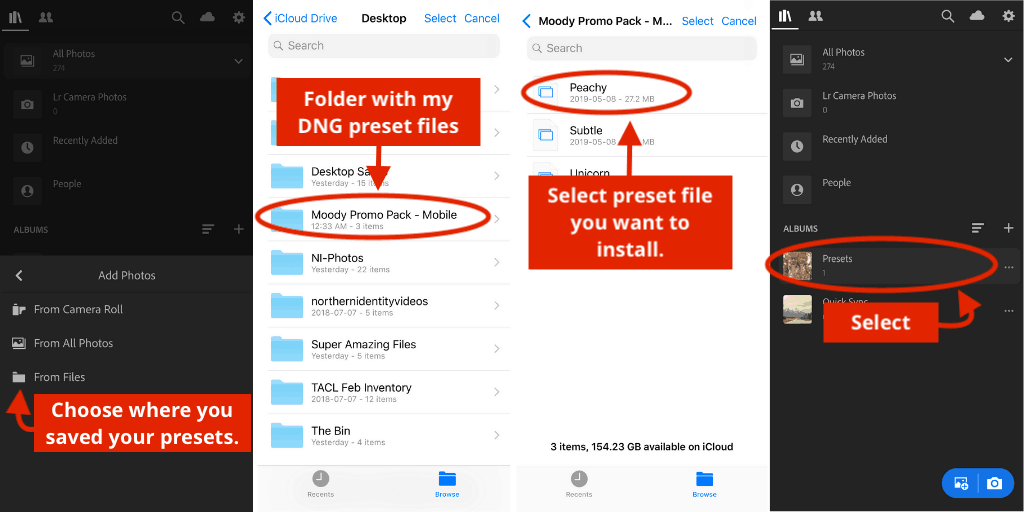
- Launch Lightroom CC mobile app.
- To keep your presets organized, create a new album by tapping on the plus “+” icon to the right of “Albums”. Select “Album”.
- Tap the 3 dots icon across from your new Album, then select “Add Photos”.
- In the “Add Photos” dialog, select where you have your DNG preset files saved on your phone. Select the presets (DNG files) you want to install and add them to the album.
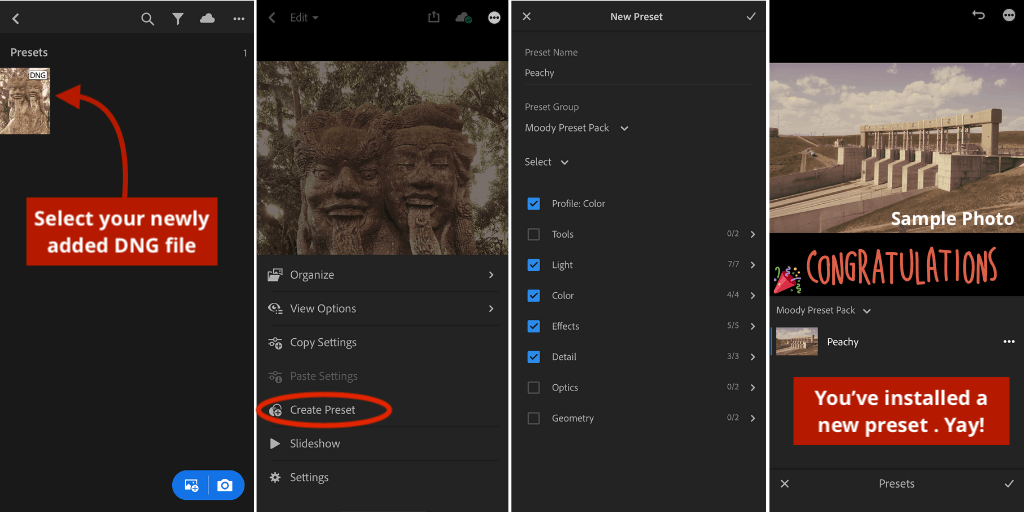
- Click to select and open the first preset you want to install. Then tap on the 3 dots icon on the top right of the screen.
- Select “Create Preset” This will open the New Preset dialogue.
- Name your preset (Copy the original preset name or make your own, it’s up to you).
- Under preset group you can either save your new preset under “User Presets” (default) or make your own preset group. Making your own preset group is preferable especially if you have or will have multiple presets with different styles, themes or use.
- Select which settings to copy. I usually keep it default, which selects everything except for Tools, Optics and Geometry.
- Tap the check icon on the upper right corner of the screen and you’re done!
Installing from ZIP files on iOS (using “Files”)
Follow the steps below if you would like to download the ZIP file directly onto your phone. Also note that the method outline below makes use of iOS’s “Files” app. You can alternatively use cloud storage services like Dropbox or Google Drive.
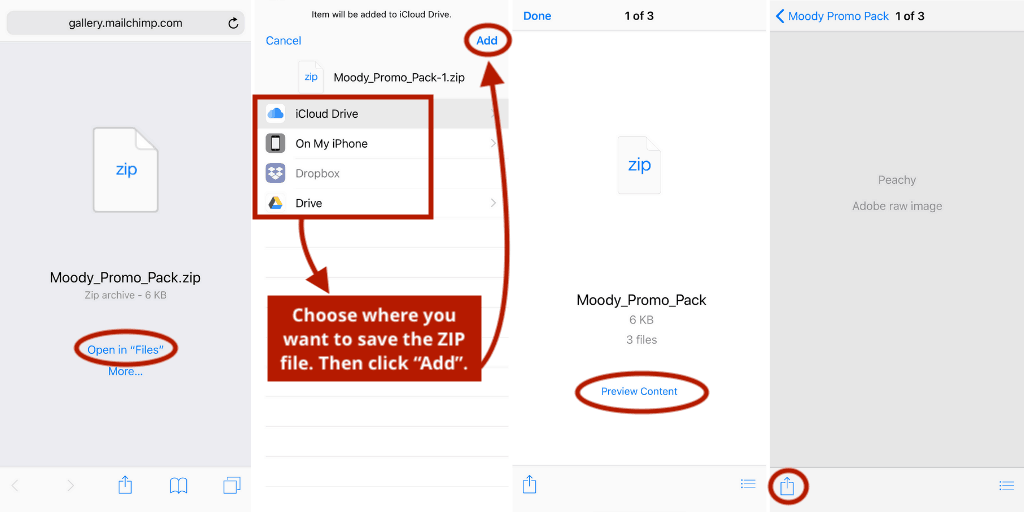
- Download your new presets into your phone.
- Open in “Files”.
- Choose where you want to save your presets (i.e. iCloud Drive or locally on your device) and then click “Add”.
- Tap “Preview Content” to view your presets. Note: Mobile presets will be in DNG, as opposed to lrtemplate or XMP for desktop. Select a preset file that you want to install.
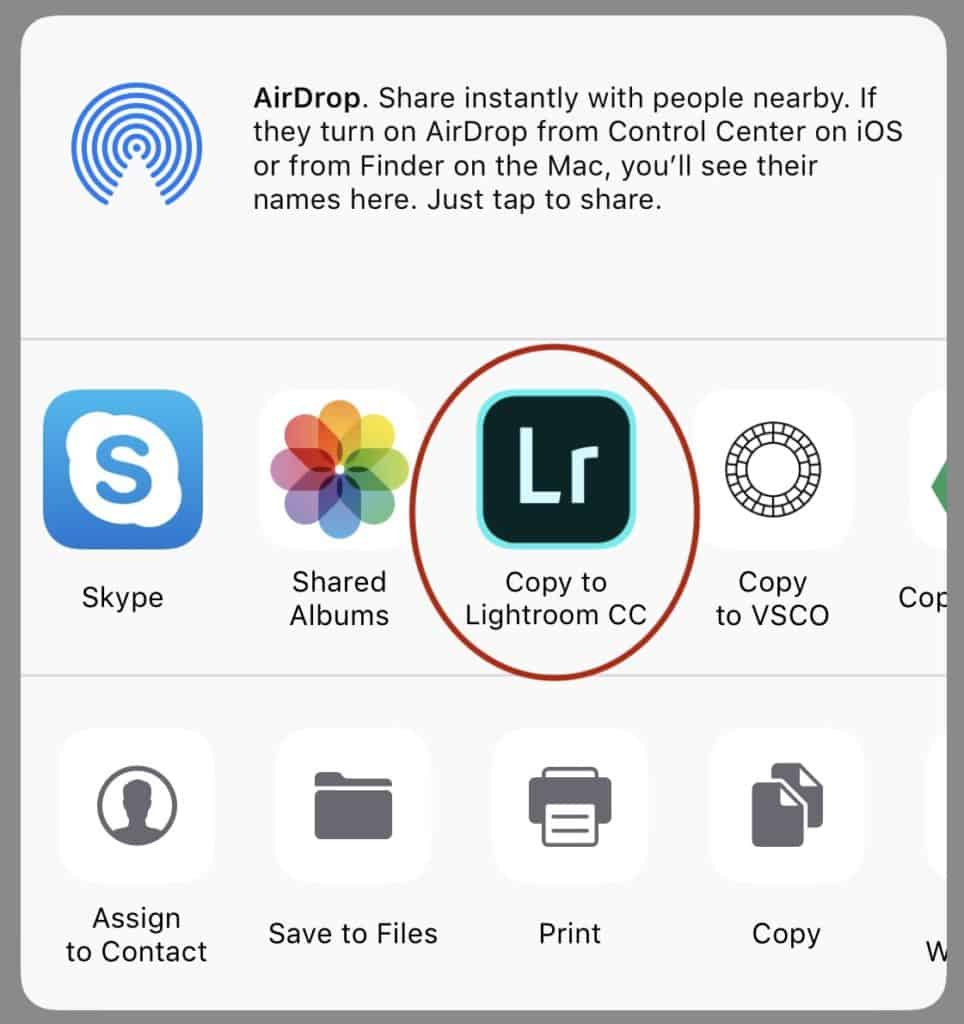
- While viewing your preset file, tap the export icon on the lower left corner of your screen.
- Select “Copy to Lightroom CC”. This will launch the Lightroom app and import the DNG file. This opens an image that contains all the adjustments that makes your new preset.
- Tap on the 3 dots icon on the top right corner of your screen. Select “Create Preset”. This will open the New Preset dialogue.
- Name your preset (Copy the original preset name or make your own, it’s up to you).
- Under preset group you can either save your new preset under “User Presets” (default) or make your own preset group. Making your own preset group is preferable especially if you have or will have multiple presets with different styles, themes or use.
- Select which settings to copy. I usually keep it default, which selects everything except for Tools, Optics and Geometry.
- Tap the check icon on the upper right corner of the screen and you’re done!
If you are installing multiple presets, you’ll have to individually save each preset. It’s a little bit tedious but the good news is you’ll only ever have to do this once. Then you’ll have access to your amazing presets with one click.
More Questions?
Phew, that was long and repetitive. But I hope this helps you figure out how to install your brand new Lightroom presets. However, if you have any questions (or if you notice any errors and want to suggest an edit), please don’t hesitate to reach out:
- Use the contact form on our website.
- Send us a DM on Instagram.
- Message us on Facebook. ()
Also, if you haven’t already, join our FB community to start discussions, ask questions, or just to interact with us and the Northern Identity community.